

 Arrives before Christmas
 To see if this custom-fit item will work for you please tell us what vehicle you'll use it with.

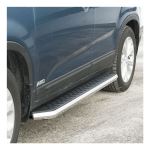
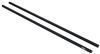
These 5" wide steps with rounded ends mount close to your vehicle for a streamlined look. Full-length plastic pads create non-skid surfaces. Constructed of rustproof aluminum with black stainless steel trim. Custom installation kit included.
Features:
Specs:

California residents: click here
Videos are provided as a guide only. Refer to manufacturer installation instructions and specs for complete information.
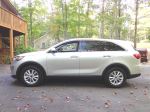
Today on our 2016 Kia Sorento we're going to be taking a look at and showing you how to install the Aries AeroTread running boards with custom installation kit. These are going to be your five-inch wide aluminum polished stainless steel boards, part #AA2051028.They're also available in black using part #AA2061028. So, here's what our running boards are going to look like once we have them installed on our Sorento. Now, these are not only going to look good, but they're going to make it a lot easier when we're getting in and out of our vehicle.Our boards are going to be five inches wide, and they're going to have a step on the top that's going to span the entire length of the board. So, no matter where we or our passengers get in and out, we'll have a secure footing.The boards themselves are going to have an aluminum construction, so they're going to be rust-proof and they'll have a rolled edge here that will come really nice, close to the body, giving it an OEM-type look.Between the board and the body here, we're going to have this rubber weather stripping. It's going to take up that unsightly gap in between, help it blend in a lot better, and give it more of a sleek appearance.Our running boards are going to have a 500-pound weight capacity, which is a lot more than most boards on the market and they are going to come with a custom bracket so we can get them installed.To install our boards, it's not going to require any kind of drilling, however we are going to have to do some minor cutting, if you have an underbody panel that goes along the edge here.And now that we've seen what our board looks like and gone over some of the features, let's show you how to get them installed.To begin our installation, we're going to want to find the three mounting points on each side.
We'll have one right behind the front tire, one just before we get to the back of the front door and then we'll have another one right in front of the rear tire.Once you have the positions mapped out, you're going to want to grab the specific bracket for each location. Double-check the instructions, because some of them do look very similar, but they're only going to fit one way.So, we'll start on the front here, and if we come underneath, right by the pinch weld, and we look directly up, we're going to have a rubber plug that's going to be the bottom of the painted section towards the outside. We're going to want to pull that plug out.And just grab a small flat-blade screwdriver or something that you can get to work that plug out and we'll pull it out. So, we can loosely take our bracket now. We're just going to dry-fit it, align it up with that hole, and you can see that, that back bracket on the arm is going to be right behind this mount here.Now, we're going to have this underbody panel on here, so we're going to have to trim that section out to expose the hole.
Now, this is just cardboard, so I'm going to use a utility knife. And I'm just going to cut, kind of in the section that's already recessed in a little bit, just cut that notch out there to expose the hole underneath.And that'll expose a plug underneath and we can pull that plug out as well. So, now we're going to grab one of our T-bolts. And we'll take the handle section and we're going to feed it into the hole just like that.And then, to help make sure that it's not going to fall out, we're going to take the plastic retainer and we're going to slide the bolt into the round section and press it up against the bottom of the frame.And this will help hold everything in place and make sure the bolt doesn't fall out. And now that we have this one in, we're going to repeat the process of putting our bolt in on the outside hole as well.With both the bolts in place, we'll take our bracket and we're going to slide it in.
You want to make sure that it goes directly against the bottom. You don't want to catch that plastic on there.Then we'll take the hardware . we'll have a flat washer, a lock washer, and a hex nut to secure everything down. So, we'll just loosely put our hardware on. Let's get it about hand-tight where the bracket can still move a little bit, but we don't have to worry about it coming off.Now, if we start moving back from our front bracket and we look on the liner here, we'll have a plastic nut.
And we'll move back one more and we'll have a metal bolt going into the bottom of our vehicle. That first metal bolt towards the front is the one we're going to want to remove.So, we can grab a 10 millimeter socket and pull that out. So, we're going to grab our middle bracket now and we'll line up the outer hole where the bolt we just pulled out was. And that will give us an idea of where the inner bolt is going to land.We're going to have to trim out the shield down here so we can expose the area for the bolt to go through. Now, if you cut that section out, you should be able to see a threaded hole in the bottom there. Those are going to be our two mounting points. Right here and then the spot where we took the bolt out towards the outside.So, now we can take our bracket and one of the included bolts in our kit and we'll go through the bracket. And we're going to go directly into where we pulled that one out.You want to get this loosely in place so it'll hold the bracket, but still loose enough so we can get the second one in. And since the hole is recessed underneath the cover, it may help to use a small extension to start the bolt.Now, the rear bracket is going to go on relatively the same as the front. We'll have a plug towards the outside here. Just take a screwdriver and pop it out. And then we're going to have another plug, but we'll need to move underneath to get to it.Now, the other plug we're looking for is going to be underneath the body, just on the other side of our emergency brake cable here. So, we'll pull that plug out as well and we can get our T-bolts in place.So, now we can put our bracket in place. This rear one is going to go in that rear bolt, however, we're going to have to move our emergency brake cable temporarily, just to slide everything in place. And again, make sure they go fully-seated against the bottom of the frame here. Then we can put our flat washer, lock washer, and nut in place.We can grab our board now and we're going to have six bolts that are in two tracks here. We're going to want to remove the nut, washers, and everything, but leave the bolts in the track.You can use a 13 millimeter socket to pull the nut off. Hold onto all this hardware, but again, we're going to be taking off each one of these bolts.Once you have the nuts and washers removed from the bolts, these do slide in the track. So, we'll have two for the front, two for the middle, and two for the back. So, we're just going to slide our bolts close to where they're going to be, so when we put our board up, it'll make it a little bit easier.So, we can take our board and you're going to kind of want to come in at an angle so that rubber strip can get underneath. And then, we're going to line up our bolts with the holes in the bracket on each one.Now, it may be a little difficult to get all of them to line up. You may have to slide the board back and forth, but just take your time and you should be able to get them all to line up.Once you have all the bolts going through the brackets, we'll take the same hardware we took off, that flat washer, lock washer, and nut. We're just going to get them on there hand-tight so we don't have to worry about the board moving around too much.Once your board is loosely attached, you're going to want to slide it back and forth to make sure you have it centered where you want it on the vehicle.Now we'll start tightening up our bracket bolts first. So, the middle one . you'll be using a 10 millimeter socket to tighten up those two bolts. And for the nuts that are on our T-bolts, we're going to be using a 17 millimeter socket.Then we can come back with that 13 millimeter socket and tighten up the nuts that are attaching the board to the brackets. With this side done, we can move to the other side and repeat the same process.That'll finish up your look at the Aries AeroTread running boards with custom installation kit, part #AA2051028 on our 2016 Kia Sorento.


Great value. Very quick delivery!
Very easy install6..arrived quickly.. looks amazing
These installed easily and look great!
Do you have a question about this Nerf Bars - Running Board?
Info for this part was:
At etrailer.com we provide the best information available about the products we sell. We take the quality of our information seriously so that you can get the right part the first time. Let us know if anything is missing or if you have any questions.


Thank you! Your comment has been submitted successfully. You should be able to view your question/comment here within a few days.
Error submitting comment. Please try again momentarily.